Wednesday 1 June 2011

Volunteer Work

Today has been a very interesting day. I have been in talks with Peter Wood from Greenwood Days about volunteering on his courses. Greenwood Days is where I first learnt about green wood working about 3 years ago so it was wonderful to see the place again after all this time.

The workshop is based in a lovely woodland which is brilliant to work in as it gives one a sense of tranquillity whilst you work. Also it allows Peter to show people what to look for in a tree for wood working. But it was wonderful to work there in the outdoors and not having to worry about making “too” much mess.


But we worked on creating a bodgers muddle out of some ash which after two attempts did get better, couldn’t quite get it working properly. But after that we working on refurbishing all of Peters shaving horses to get them ready for his courses this summer which was good fun

By volunteering I hope to improve my skills by trying my hand at anything. Whether it is sharpening or making cups of tea it will add to my skills base and expand my knowledge of working wood. I look forward to working with Peter in the near future.
Friday 1 April 2011

Maple Eating Spoons

Only a short post this time

My last post being about reproduction I thought it about time I show the results of my attempted reproductions on my blog.

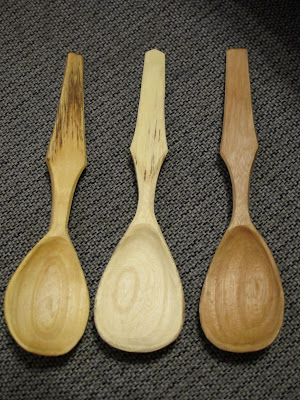
Uni work is getting hectic at moment meaning less time to do other things…..like carving sadly. Luckily though, over the past week I found a few hours here and there to finish up some of the rough carved eating spoon blanks. Have tried my best to replicate my original maple eating spoon on the far right. The two on the left being the replicas again made out of maple. The shapes of the bowl are similar enough but the far left one being slightly more rounded and less elongated than the other two. Also notable are the variation in handles, which although not great in terms or reproduction, it does give a nice aesthetic when comparing them.

Either way it is a good feeling to be able to reproduce a spoon style and see the results. Cannot quite describe it fully but it is a nice feeling.

Sunday 13 March 2011

The Art of "Reproduction"

This week I have been having a go doing some spoons in a different style from my usual ones. Mainly because I fancy exploring the different bowl shapes for a spoon and also because I have never done rounded spoon bowls. These may look simple but do require a slightly different approach when carving, the most important being to get the end bowl perfectly round and not ending up with a triangle or making look like a hexagon.

But whilst doing the style it gave me the idea of trying to reproduce it. Creating something bespoke (in spoon carving anyway) is quite easy in that each spoon will be different, possibly because each piece of wood will work in a different way facilitating in a change in design or just because you make a mistake and you have change the design to amend the mistake. But to reproduce the same style requires that you take some control of your wood/material. Not complete control but enough to make you consider “which way do I want the grain to run for this exact cut”. Reproducing will also test your carving skills, how closely you can follow plans, how mistake free you technique is, and most important of all your discipline as this becomes less about being free an easy and more about focusing on the tiny little aesthetics.

Any way I have waffled on about reproduction, here is a finished spoon on the left and its ROUGH reproduction on the right, both made out of maple. So far so good but the rough one is slightly larger at the moment and just need to be refined once it’s a little drier, and assuming/hoping that I make no mistakes it should be a good reproduction. Hopefully the 3rd one will be a little easier.


In an earlier blog I mentioned gathering spoon crooks from Peterborough. Have been slowly working with one of the crooks to create a ladle and this is the fruits of my labour. This is the first time I’ve done one since robin’s course last year and it is a little thin in place’s but should work really well in its function.


Also roughed out another possible ladle out of another crook. Remember when I mentioned about changing design due to your wood/material well this is a prime example. The crook bends to the left making it more suitable for a left handed user (which I am!). But it shows how that some pieces will have to change just because of your material.

Once I finish both of these I will show the results on here. Fingers crossed it alls go to plan :-).

Monday 28 February 2011

Spoon Crook Hunting

Over the weekend I went down to my dads in Peterborough to celebrate his birthday with him. Whilst there I went to the local woodland park close to his house to go search for any wood that had been recently felled. Whilst doing this I thought it would be worth looking for some crooks to make some nicely cranked spoons from. There wasn’t a great choice of species as willow was the only thing that was felled at the time, but beggars can’t be choosers. It will make some excellent general cooking spoons, plus will be nice to practice for when I get denser/harder crooked woods.

Some of the crooks I was able to find:


Over the next couple of days or weeks these crooks will be fully carved up into lovely spoons.

Wednesday 16 February 2011

Finshed Shelf and A New Book

Have now finished painting the carved shelf from my last post. Did it in a lovely cream and red to match my room and then gave it a little varnish to keep it in good nick. After that I put it up and began stacking all the books on it as you can see.


The reason why I did this whole design on the shelf was because I felt that a plain wooden shelf would be……well…..just boring!!! The work I’ve put into it makes it look unique and a little quirky but most importantly it makes my shelf as is can remember putting in all the notches and diamonds, all the paint, all the mistakes. Because of all of these points it just feels much nicer in my bedroom and a joy to use.

And its ready just in time as this morning I had a lovely and exciting package waiting for me from America! A soon as I saw it I ripped it open to find a copy of………

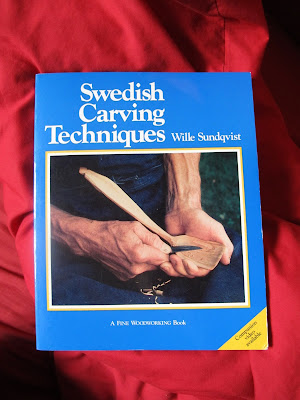
Wille Sundqvist’s “Swedish Carving Techniques”. Finally found a copy of it at a decent price and in a very good condition as well. For those who don't know who Wille Sundqvist is, he is one swedens best crafts people, he was also one of swedens provincial handcraft consultants, and his carved works are an inspiration to hundreds of craftspeople. Some of the information from his this book will hopefully better my understanding of carving so my spoons will hopefully get better. Only time will tell……….

Wednesday 9 February 2011

When One Gets a Little "Board"

Over the past couple of months my parents and I have been saying that I need some shelving in my room for the books I have. Being a historical re-enactor one does tend to acquire a lot of books on history, armour, politics, household accounts, archaeology, and so on. However due to the small book space I currently have many of these books were living life on the floor, not the best place for a book.

As a woodworker I saw it as an opportunity to have a little fun and customise a piece of furniture for my room. I accompanied my parent to B&Q and bought some pine boarding. I know its not green wood as this blog focuses on but it was a little fun project for myself.

To achieve the design I had in mind I marked up the board every 2 centimetres.

Then next cut into the marks.

And then simply removed some of the wood on either side of the marks to create a diamond shape. I alternated the diamond pattern to produce this effect with diamond, square, diamond, square, etc.

All in all I am quite pleased with the effect the pattern creates. Give the shelf presence and looks a lot better than a plain flat shelf. Have now just got to paint the shelf and attach it to the supports.

Because of this I am now have ideas on other forms of patterning that I could do on future shelves. Maybe a zigzag pattern? Its amazing what one can do in a couple hours with a sharp knife, a bit of wood, and a little artistic vision.

Sunday 6 February 2011

First Spoons of the New Year

Have finally got round to getting myself a new camera over Christmas after my last one went wizz bang kaboom. Thought I’d have a practice by taking some photos of some of my recent spoons. Had ago playing with some lighting effects on a few of them with the lamp on my desk, Something cheap and cheerful which gave some good effects.

These spoons are from a small log of birch which I got down from Peterborough. Carved them up over a couple of weeks, roughing them out then leaving them to dry out over 2-3 weeks and finishing them later. The reason I did them over three weeks is partly due to other commitments.

3 easting spoons and a server.

A close up of the tooled finish. getting better.


Had a go at soaking the spoons in linseed oil to get the transparent affect. its an interesting effect thought the spoons do leak linseed oil everywhere. possibly they need more time to cure. Also with the serving spoon I had ago at carving a design on the handle to add a little bit of pisaz.

These being the first spoons of 2011, am looking forward to carving more spoons.